Experiment 2: Power Factor Correction
Objectives
To understand the power diagram, active, reactive, apparent power, power factor correction and the effect on transmission line losses.
PreLab:
Download and Install PowerWorld on your computer. Create an oneline Diagram with a transmission line and a series R-L Load connected to a generator. Place a variable capacitor across the load. Run the program and debug any issues. Values you’ll need to enter for the generator, transmission line and loads are given in the appendix on Power world. Submit your one-line diagram file via Moodle.
Theory
The relevant theory related to real, reactive, and apparent power should be reviewed in your ECE 231 book before doing the experiment. The following ―in quote is taken from Wikipedia.org http://en.wikipedia.org/wiki/Apparent_power under the Creative Commons Attribution-ShareAlike License
In a simple alternating current (AC) circuit consisting of a source and a linear load, both the current and voltage are sinusoidal. If the load is purely resistive, the two quantities reverse their polarity at the same time. At every instant the product of voltage and current is positive, indicating that the direction of energy flow does not reverse. In this case, only real power is transferred.
If the load is purely reactive, then the voltage and current are 90 degrees out of phase. For half of each cycle, the product of voltage and current is positive, but on the other half of the cycle, the product is negative, indicating that on average, exactly as much energy flows toward the load as flows back. There is no net energy flow over one cycle. In this case, only reactive energy flows—there is no net transfer of energy to the load.
Practical loads have resistance, inductance, and capacitance, so both real and reactive power will flow to real loads. Power engineers measure apparent power as the vector sum of real and reactive power. Apparent power is the product of the root-mean-square (rms) voltage and current.
Engineers care about apparent power, because even though the current associated with reactive power does no work at the load, it heats the wires, wasting energy. Conductors, transformers and generators must be sized to carry the total current, not just the current that does useful work.
Another consequence is that adding the apparent power for two loads will not accurately give the total apparent power unless they have the same displacement between current and voltage (the same power factor).
If a capacitor and an inductor are placed in parallel, then the currents flowing through the inductor and the capacitor tend to cancel out rather than adding. Conventionally, capacitors are considered to generate reactive power and inductors to consume it. This is the fundamental mechanism for controlling the power factor in electric power transmission; capacitors (or inductors) are inserted in a circuit to partially cancel reactive power 'consumed' by the load.
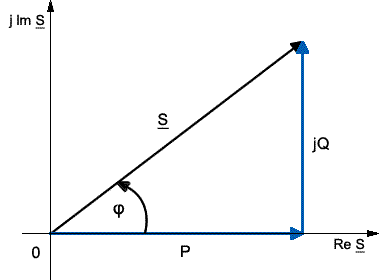
The apparent power is the vector sum of real and reactive power.
Real power (P)
Reactive power (Q)
Complex power (S)
Apparent Power (|S|)
Phase of Current (φ)
Engineers use the following terms to describe energy flow in a system (and assign each of them a different unit to differentiate between them):
· Real power (P) or active power [1]: watt [W]
· Reactive power (Q): volt-amperes reactive [Var]
· Complex power (S): volt-ampere [VA]
· Apparent Power (|S|), that is, the absolute value of complex power S: volt- ampere [VA]
· Phase of Current (φ), the angle of difference (in degrees) between voltage and current; Current lagging Voltage (Quadrant I Vector), Current leading voltage
(Quadrant IV Vector)
In the diagram, P is the real power, Q is the reactive power (in this case positive), S is the complex power and the length of S is the apparent power.
Reactive power does not transfer energy, so it is represented as the imaginary axis of the vector diagram. Real power moves energy, so it is the real axis.
The unit for all forms of power is the watt (symbol: W), but this unit is generally reserved for real power. Apparent power is conventionally expressed in volt-amperes (VA) since it is the product of rms voltage and rms current. The unit for reactive power is expressed as var, which stands for volt-amperes reactive. Since reactive power transfers no net energy to the load, it is sometimes called "wattless" power. It does, however, serve an important function in electrical grids and its lack has been cited as a significant factor in the Northeast Blackout of 2003.[2]
Understanding the relationship between these three quantities lies at the heart of understanding power engineering. The mathematical relationship among them can be represented by vectors or expressed using complex numbers, S = P + jQ (where j is the imaginary unit).
Power factor
The ratio between real power and apparent power in a circuit is called the power factor. It's a practical measure of the efficiency of a power distribution system. For two systems transmitting the same amount of real power, the system with the lower power factor will have higher circulating currents due to energy that returns to the source from energy storage in the load. These higher currents produce higher losses and reduce overall transmission efficiency. A lower power factor circuit will have a higher apparent power and higher losses for the same amount of real power.
The power factor is one when the voltage and current are in phase. It is zero when the current leads or lags the voltage by 90 degrees. Power factors are usually stated as "leading" or "lagging" to show the sign of the phase angle, where leading indicates a negative sign.
Purely capacitive circuits cause reactive power with the current waveform leading the voltage wave by 90 degrees, while purely inductive circuits cause reactive power with the current waveform lagging the voltage waveform by 90 degrees. The result of this is that capacitive and inductive circuit elements tend to cancel each other out.
Where the waveforms are purely sinusoidal, the power factor is the cosine of the phase angle (φ) between the current and voltage sinusoid waveforms. Equipment data sheets and nameplates often will abbreviate power factor as "cosφ" for this reason.
Example: The real power is 700 W and the phase angle between voltage and current is
45.6°. The power factor is cos (45.6°) = 0.700. The apparent power is then: 700 W /
cos (45.6°) = 1000 VA.
Reactive power
Reactive power flow on the alternating current transmission system is needed to support the transfer of real power over the network. In alternating current circuits energy is stored temporarily in inductive and capacitive elements, which can result in the periodic reversal of the direction of energy flow. The portion of power flow remaining after being averaged over a complete AC waveform is the real power, which is energy that can be used to do work (for example overcome friction in a motor, or heat an element). On the other hand the portion of power flow that is temporarily stored in the form of electric or magnetic fields, due to inductive and capacitive network elements, and returned to source is known as the reactive power.
AC connected devices that store energy in the form of a magnetic field include inductive devices called reactors, which consist of a large coil of wire. When a voltage is initially placed across the coil a magnetic field builds up, and it takes a period of time for the current to reach full value. This causes the current to lag the voltage in phase, and hence these devices are said to absorb reactive power.
A capacitor is an AC device that stores energy in the form of an electric field. When current is driven through the capacitor, it takes a period of time for charge to build up to produce the full voltage difference. On an AC network the voltage across a capacitor is always changing – the capacitor will oppose this change causing the voltage to lag behind the current. In other words the current leads the voltage in phase, and hence these devices are said to generate reactive power.
Energy stored in capacitive or inductive elements of the network give rise to reactive power flow. Reactive power flow strongly influences the voltage levels across the network. Voltage levels and reactive power flow must be carefully controlled to allow a power system to be operated within acceptable limits.
Equipment
- An inductor with a separate magnetic core.
- A variable capacitor bank.
- Resistive Load Cart
- Two multimeters and two wattmeters.
- Single Phase Induction Motor
- Variable Resistor/Rheostat 12 Ω / 6.3 Amps
Procedure
- Without the iron core inserted, measure the resistance of the inductor with a DMM.
- Apply a few volts to the inductor making sure that the inductor current does not exceed the rated current. Measure and record the voltage, current and power factor. Repeat for 120Volts (or the maximum you can without exceeding the inductor current rating). Turn off the AC power.
- Insert the iron core into the inductor and repeat the measurements of step 2 to perform an experimental study of the effect of the iron core on the inductance.
- Remove the iron core and add a resistance in series with the inductor to set up a circuit.
- Apply 120 Volts to the inductor in series with the resistance and add a resistance value so that the power factor angle is approximately 45° degrees. Measure and record the current, voltage, and powers (S, Q, and P). Without AC power in the circuit, measure and record the resistance added to the inductor.
- Connect a variable capacitor across the RL series combination. Measure and record the current, voltage, powers (S, Q, and P) and power factor for a variety of capacitance values until reach a power factor of 1.
- Use a power transformer and a variable resistor / rheostat to create a model of a transmission line. You should connect as many of the four coils of the transformer in series (in the appropriate order) to create an inductance of about 500 mН to 200 mH with a parallel resistance of about 5 to 10 Ohms. You may not need to add any resistance as there will be losses in the transformer. Try and make sure you operate the inductor in its linear region.
- Connect your AC source through your transmission line to your parallel circuit of Capacitance and R-L series combination. Arrange to measure powers (S, Q, and P) and power factor into and out of your transmission line.
- Apply 120 Volts to the circuit without capacitance value in the R-C-L circuit combination and making sure that you still have a power factor for an angle of approx. 45° degrees. Measure and record the powers (S, Q, and P) and power factor as a function of your balancing capacitance until reach a power factor of 1
Report
In addition to the usual structure of a report make certain to include the following items.
- Your calculation of the needed resistance to create a power factor angle of 45°. What Resistance did you use and what pf resulted?
- Compare the values of power factor (pf) measured for the capacitance in parallel with your R -L load with the results of computation.
- Plot the powers (S, Q, and P) losses vs. capacitance. Determine from your data the capacitance value that produces the lowest transmission loss.
- Use your PowerWorld model from prelab with an additional capacitive load inserted. Run your model while changing value of the balancing capacitor. Plot MW and MVAR losses in your transmission line vs. Capacitance. Your results won’t match your experiment exactly but comment on the characteristic differences and similarities.
PowerWorld Appendix
Download the version designed for the ECE 442 textbook by Glover Sarma and Overbye, here.
Use this link, but be sure to download the last version of the simulator (19).This downloads the software as well as demonstration files for your book.
You can use “file of Intro to PowerWorld simulator” and read section 1.5 of your ECE 442 textbook.
On-line training with videos and more detailed explanations is provided by Powerworld here
Power World is a graphical editor which allows easy creation of power systems combined with a powerful analytical tool for doing a variety of power flow analysis on power systems, both steady state and transient. It was created for teaching power systems analysis at universities. Because power systems typically work with significantly larger quantities of voltage, current and power than we do in this lab, our use of Power world will require us to boost the level of our signals in the model. The default units are kV and MW or MVAR. So rather than modelling 208V, or 120V we’ll use 208 kV or 120 kV.
For this Lab you will primarily be using the Draw and Tools toolbars. The Draw toolbar to create your one-line diagram and the Tools toolbar to run the power flow calculation.
Open power world
File ➜ New Case. Opens new oneline diagram sheet
You add items to your one line diagram from the Draw toolbar. Your generator, busses (nodes), transmission line and loads will be entered by clicking on the network drop-down menu on the Draw toolbar, selecting the item that you wish to add, moving the curser to the location on your diagram where you wish to place the item and clicking again. An exception is the transmission line item. Each time you click the line is extended to the location of your click. The line is terminated with a double-click. You should first click on one of the busses to be connected and then a few more times to route the T-line and then double clicking on the final bus.
Whenever you add an element a dialog box opens up to allow the entry of parameters for the element you are adding. It isn’t necessary at this stage for you to understand all of the parameters, but there are some important ones to enter. The table below indicates the important information for each element
| Element | Information you should enter |
|---|---|
| Bus |
|
| Generator |
|
| Load |
|
| Transmission Line |
|
Take some time to look at the other tabs in the dialog boxes and play with them if you like. Some just effect the looks of the diagram and others effect how the element behaves.
When you have any questions, you can always hover your curser over an item, entry area, etc. and press F1 which brings up the on-line help for the item you’re hovering over.
When you have entered your elements you must switch from the edit to the run mode on the far left of the ribbon bar. Then select the Tool toolbar. In the power Flow tools section look for the arrow – if it is green pushing it will continuously solve your case. If it is not green, click on solve and select the Full Newton method. After this the arrow should now be green.
Fields and variable fields. To display fields (solution values) for elements one needs to go to the draw toolbar, Select the Fields drop down menu from the Individual Insert section, choose the type of element whose field you’d like to see then click on the specific instance of that element. Choose which field to show from the dialog box that opens. You can make the field adjustable during the run by entering a value in the “Delta per click” box.