LAB 4: INTERNAL IMPEDANCE OF INSTRUMENTS;
INFLUENCE OF INSTRUMENTS ON CIRCUITS
OBJECTIVES
Demonstrating the difference between “ideal” and real instruments and the influence of real instruments on circuits. Measurements of internal resistances of digital and analog voltmeters, ammeters, and the output resistance of a voltage source (a waveform generator).
INTRODUCTION
In the previous experiments we built circuits and made measurements on them by attaching instruments (a voltmeter, an ammeter or a scope) to various circuit points. In analyzing circuits performance we neglected the instruments presence assuming tacitly that they have no influence on current and voltage distributions. Such an assumption is valid only for “ideal” instruments but may be quite reasonable also for real instruments in most practical cases. There are situations, however, where the presence of an instrument attached to a circuit alters its performance to the point where the measurement is meaningless, and other methods of circuit evaluation are needed. For instance, if a voltmeter connected across a circuit element draws a current comparable to the current flowing through that element, it changes the current and voltage distribution in the rest of the circuit. An ideal voltmeter does not draw any current, a good voltmeter very little. Modern digital voltmeters are very good in this respect.
A real instrument, such as a digital or analog voltmeter, may be represented by an equivalent circuit consisting of an ideal meter and its internal resistance. In general we should consider internal impedance, which beside resistance may have a capacitive or inductive component. For example, a capacitive component of the scope input impedance plays a role in high frequency measurements. We will see this effect in the next laboratory.
Another class of instruments in which internal resistance plays an important role is represented by power supplies. A voltage supply, such as a battery or the power supply at your bench can be represented as an ideal voltage source and a resistance (output resistance). In an ideal voltage source this resistance is zero, so there is no voltage drop across it, and the output voltage is independent of the amount of the current drawn.
In this set of experiments you will measure internal resistance of basic instruments used in the laboratory and demonstrate simple situations where their internal resistance plays an important role. The lesson is worth remembering whenever you attach external instruments to an electronic circuit.
We will revisit the topic of the input impedance of our most important instrument, the oscilloscope, in a later laboratory. The complex impedance of the oscilloscope requires knowledge of the response of RC circuits, which will be covered first.
PRELAB
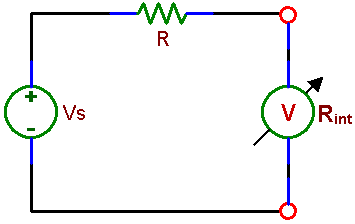
Knowing that to measure voltage you need to connect a voltmeter between two points of a circuit and that the voltmeter should have little effect on the circuit, what do you think is the value ofthe voltmeter internal resistance, high or low? What is the resistance of an ideal voltmeter which does not influence a circuit at all (does not draw any current)? A real voltmeter can be represented by a circuit consisting of an ideal voltmeter and a resistor representing its internal resistance. Draw the schematic of that circuit, indicating terminals which represent leads used for voltage measurements. Write an equation for finding the unknown voltmeter internal resistance Rint if you know the value of the resistor R and the voltage Vs in experiment 1.1 of this laboratory( Fig 4.1).
Draw an equivalent circuit of a real ammeter, consisting of an ideal instrument and the internal resistance. Again, a good instrument should have a minimal effect on a circuit being measured. Remember that, unlike a voltmeter, an ammeter connects in series with the measured circuit. So, an ideal ammeter should not resist current flow and should not develop any voltage across its terminals.
An ideal voltage source gives voltage which is independent of current. A real source can be represented by an ideal source and the internal resistance, on which a voltage drop develops as the current flows. Thus a real voltage source gives lower voltage with a load (e.g. a resistor) than without a load. Write an equation for finding the unknown waveform generator internal resistance Rint if you know the value of the load resistor RL and the voltages measured in experiment 1.3 of this laboratory
LABORATORY
Equipment needed from the stockroom: analog universal meter, leads.
1. INTERNAL RESISTANCE OF INSTRUMENTS.
1.1 Internal resistance of
voltmeters.
a) Measure the internal resistance of the digital voltmeters at your bench in the DC mode on two different ranges by setting the DC power supply first to a low voltage (no more than 1 V) and then to a higher voltage (over 20 V).
Use an appropriate resistor between the source and the meter. The resistor will form a voltage divider with the internal resistance of the meter. Assume (for this case) that the voltage source has zero internal resistance. Two measurements will do it! Using an appropriate resistor means that the voltage measured with the resistor is significantly lower than without it (for example by ½). It is easier to use a resistance substitution box (from the stockroom) than resistors from your kit, which have a limited range of values. Check, however, the box resistance with an ohmmeter after you select the position of switches.
b) Repeat measurement a) using the waveform generator supplying a sine wave with a frequency of 50 to 100 Hz , with the amplitude of a few volts.
Fig. 4.1: Measurement of the internal resistance of a voltmeter.
c) Repeat measurement a) for the analog voltmeter.
You may need to use different R than in part a).
d) Repeat measurement b) for the analog voltmeter.
1.2 Internal resistance of
an analog and a digital ammeters (DC).
Use a 1kΩ resistor in series with the analog ammeter to protect it from excessive current!
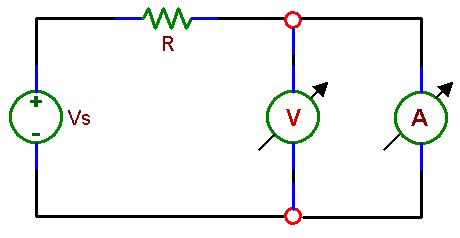
Use a digital voltmeter to measure the voltage drop cross the tested analog ammeter which shows the current (see the schematic below). Ohm’s law will give you the answer.
Make measurements in two ranges: small current (less than 1 mA) and a larger current (about 10 mA). Set these currents by adjusting the power supply voltage.
Be careful not to drive excessive current through the ammeter! Increase power supply voltage slowly. Do not overheat the resistor. Small resistors in your kit are rated ¼ W.
To measure the dc resistance of a digital ammeter do not use an analog voltmeter. It will not show well the very small voltage drop you expect to measure. Use an oscilloscope instead.
Fig. 4.2: Measurement of the internal resistance of ananalog ammeter with a digital voltmeter.
1.3 Internal resistance of
the waveform generator at your bench
Measure the gene rator output voltages at load and no load conditions. . The load resistor will form a voltage divider with the internal resistance of the source (the generator). Without the load resistor the source internal resistance has no effect on the measurement, if the internal resistance of the meter is high (you already know that it is!).
The load resistance should be low enough to see the voltage change due to the load.
2. INFLUENCE OF MEASURING
INSTRUMENTS ON A CIRCUIT.
In these experiments you should see the difference in the effect of a voltmeter on circuits with much lower impedance and with impedance comparable to the impedance of the meter.
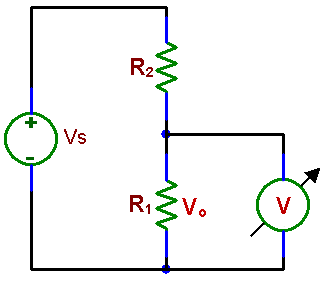
Fig 4.3: A resistive voltage divider
2.1 Low Impedance Circuit
Make a simple voltage divider to attenuate signals by a factor of 2. Use two equal resistors of about 10 k and measure their values with a digital ohmmeter. Determine the attenuation of the divider by measuring the input and the output voltage (use the same instrument for both). Make the following measurements: (a) with DC using an analog voltmeter, a digital voltmeter, (b) with AC (a sinewave signal of about 100 Hz) using an analog voltmeter, a digital voltmeter and an oscilloscope.
2.2 High Impedance Circuit
Repeat measurements 2.1 after changing both resistors to about 200 k.
REPORT
Make a table showing ranges of the two voltmeters and their internal resistances. Comment on the merits of different instruments.
Do your measurements in part 2.2 agree with the calculated divider attenuation? If not, explain why using your knowledge of the instruments resistance. For calculating “theoretical” attenuation use actual (measured) resistances, not nominal resistor values.
What do you think may be the internal resistance of the oscilloscope?