ECE 291 - Electrical Engineering Laboratory
LAB 2: BASIC CIRCUIT LAWS; DC
OBJECTIVES
Verifying experimentally Kirchoff’s laws and Ohm’s law in a series-parallel circuit. Establishing experimental error limits within which the laws can be verified with the instruments in the laboratory.
PRELAB
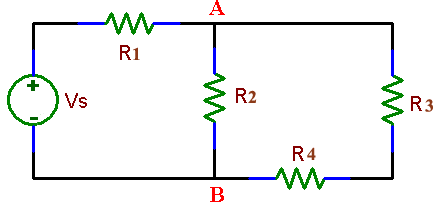
- Write Kirchoff’s Voltage Law (KVL) for two loops, and Kirchoff’s Current Law (KCL) for one of the nodes in the circuit shown in Fig. 2. Make a brief plan for verifying these laws (what to measure? how to show that the laws are true?).
- Redraw the circuit in Fig. 2 including connections to a voltmeter and an ammeter needed to show that the measured voltage and current satisfies Ohm’s Law applied to resistors R1. Repeat for resistor R4.
LABORATORY
Equipment needed: ECE291 parts kit, a protoboard, leads.
Select four resistors in the 1k to 20k range from the parts kit, not using more than two resistors of the same nominal value. Nominal values can be determined from the color code but measure precisely each resistor with the digital meter at your bench. Using these resistors, assemble the circuit shown in Fig. 2 on a proto-board. Connect leads from the DC power supply to the terminals on the board and connect the terminals to the circuit with small wires by pushing their ends into the holes in the board. Set the voltage on the power supply to a few volts.
1. KIRCHOFF’S VOLTAGE LAW
Measure voltages with the DVM across all resistors(V1 to V4). Switch the voltmeter to an appropriate range for a given voltage, so that you can measure it with the best precision that the meter can provide (maximum number of digits on the display). Measure also the source voltage Vs with the same meter.
HINT: Voltage between two points in a circuit can be measured by touching them with the ends of voltmeter leads, provided that you can make a good and steady contact at the time of reading (easy in a two person team). If you need to make a continuous contact to a circuit point on a proto-board, do not grab circuit elements (resistors) with spring clips at the end of the leads. The parts can be pooled from the board holes loosing contact or even damaged. It is much better to insert an extra small wire to an adjacent hole in the board and clip the meter lead to that wire.
Using the measured voltage values show that KVL applies to two loops in the circuit in Fig. 2. Write the law in the form of an equation with the source voltage on one side and the sum of appropriate voltages on the other. Substitute the measured voltages into the equation. If both side of the equation are not equal, express their difference in percent. The difference should not be much larger than the precision of your instruments.
ADVICE: make calculations in your notebook in the laboratory. If there is a serious discrepancy between calculated and measured values you can verify your results. It will be too late when you discover problems writing the report at home.
2. KIRCHOFF’S CURRENT LAW
Verify now KCL for one of the nodes in the circuit in Fig. 2. Instead of measuring voltages across resistors, measure now currents flowing through resistors. Remember that an ammeter must be connected differently than a voltmeter. You can not connect it across a circuit element as this would make a parallel circuit with very different currents in each branch. It may be even dangerous to the meter and the circuit since an ammeter has a very low resistance; it is practically a short circuit. Instead you need to connect an ammeter in series with a circuit, so that the same current flows through the meter and a given resistor. This is somewhat more involved than voltmeter measurements because you need to break a circuit branch and to insert the ammeter in the break. Again, it is better not to grab resistors with the spring clips at the end of the meter leads but to attach the clips to small wires inserted into contact holes on the board.
Verify that KCL applies to the selected circuit node by inserting the measured current values to an appropriate equation and analyzing a numerical difference between the two sides.
3. OHM’S LAW
Now that you measured voltages across all resistors in the circuit and currents flowing through them, it is easy to check if Ohms law applies to the circuit. Prepare a table listing the voltages and currents for all four resistors. In one of the columns list resistances calculated from these voltages and currents using Ohm’s law. In next column list the resistances measured with the digital ohmmeter. The last column should give the relative difference (in percent) between the two resistance columns, which indicate to what extend your measurements agree with Ohm’s law.
Finally calculate the total resistance of the (series-parallel) circuit using the resistances measured with the ohmmeter and verify that it agrees with the voltage and current from the source.
REPORT
-
Include all schematics with the measured values of the components. Present the data, indicating clearly which are measured and which calculated values. Using tables is a good form of presenting measured values and calculations (give their differences in %). Are the measurements in “perfect” agreement with theory? If not, explain possible reasons for discrepancies.
- Do not forget to number figures and tables and to give them captions (titles). Number all pages of the report.